

Deploying a Containerised App using Docker, Django REST Framework and Postgres
Introduction to Containerisation with Docker


Table of contents
Introduction to Docker
Docker is a tool that greatly simplifies the process of developing, deploying, and running applications. By using containers, Docker ensures that an application runs smoothly and consistently across different computing environments.
This article highlights Docker's relevance and basic Docker commands, as well as demonstrates how Docker can be used to deploy a REST API web application that operates using a Postgres database.
Why Docker is Relevant?
Docker simplifies the development process by creating a standardized environment for your application. This means developers can focus on writing code without worrying about the system that it will ultimately run on. It resolves the common issue of encountering bugs or failures when moving code from a development environment into production due to differences in operating systems or other software configurations. This consistency is invaluable in collaborative settings where multiple developers contribute to the same project.
Basic Docker Commands
Understanding a few basic commands can get you started with Docker:
docker run: This command is used to create and start a container. For instance,docker run hello-worldruns a test image to ensure Docker is correctly installed and operational.docker build: This command is used to build an image from a Dockerfile. The Dockerfile contains a set of instructions to assemble the image.docker images: Lists all the images currently downloaded on your system.docker ps: Lists all the running containers. Adding the-aflag (docker ps -a) will show all containers, even the ones that are stopped.
Docker Images and Containers
Docker Images: An image is a lightweight, standalone, and executable software package that includes everything needed to run a piece of software, including the code, runtime, libraries, environment variables, and config files.
Docker Containers: A container is a runnable instance of an image. You can think of it as the execution of an image, the runtime instance of a Docker image. Containers isolate software from its environment and ensure that it works uniformly despite differences for instance between development and staging.
Setting Up and Installing Docker
Installing Docker is straightforward:
Download Docker: Visit the Docker website and download the Docker Desktop application for your operating system (Windows/MacOS/Linux).
Installation: Run the installer and follow the on-screen instructions.
Verification: To verify the installation, open a terminal or command prompt, and run the command
docker --versionto ensure Docker was installed correctly.
Docker not only eases the development process but also plays a significant role in deployment and testing. It eliminates the "it works on my machine" problem, making it easier to collaborate and push your applications to production faster. As you continue to explore Docker, you'll discover a robust set of features that will make your development process more efficient and streamlined.
Creating the Django REST Application
Open your PC CLI, create a directory for the project and go into the project directory.
    mkdir project-directory-name
    cd project-directory-name
Create and activate a virtual environment.
  python3 -m venv .venv
  source .venv/bin/activate
Install Django.
python -m pip install DjangoNavigate to the
srcfolder within the project folder and start a Django project. This will create aapidirectory in your current directory.django-admin startproject apiRun
python manage.py migrateperform db migrations.Run the command
python manage.py runserverto start the app locally. Visit http://127.0.0.1:8000/ to view the Django welcome screen.In the API directory, create a
requirements.txtfile and add it as one of the app dependencies.You can see a
db.sqlite3file that has been created in thesrc/apifolder. This is the default database that comes with Django. It cannot be used in production environments. We can remove this file from the folder since we will be using a Postgres database.
Dockerizing the Django Application
# pull official base image
FROM python:3.11.4-slim-buster

# set work directory
WORKDIR /usr/src/app

# set environment variables
ENV PYTHONDONTWRITEBYTECODE 1
ENV PYTHONUNBUFFERED 1

# install dependencies
RUN pip install --upgrade pip
COPY ./requirements.txt .
RUN pip install -r requirements.txt

# copy project
COPY . .
Create a
Dockerfileinsrc/apifolder. This file contains instructions for building a Docker image for your Django app.The first line of the Dockerfile sets the Python base image for subsequent instructions using the
FROMinstruction.Following this, the
WORKDIRis set. This is a Dockerfile instruction used to define the working directory in the container. When you specify aWORKDIR, it means that any subsequent Dockerfile commands will be executed in this directory.ENV PYTHONDONTWRITEBYTECODE 1andENV PYTHONUNBUFFERED 1are environment variables within the Docker container.PYTHONDONTWRITEBYTECODEtells Python to not write.pycfiles. This can be useful in a Docker environment to keep the container slim, as these files are not necessary for the application to run, and avoiding them can save space and reduce clutter in the file system.PYTHONUNBUFFEREDtells Python to run in an unbuffered mode. This means you can see the logs/output from your Python application immediately, which is especially helpful in environments where timely log data is crucial (like in production environments or when troubleshooting issues in containers).Install dependencies.
The
COPY . .line in a Dockerfile is an instruction that copies new files or directories from a source (the first.) to a destination (the second.) inside the Docker container's filesystem.
Using Docker Compose for Orchestration
Create a
docker-compose.ymlin the project root folder. This file defines the services (Django app, PostgreSQL).version: This specifies the version of the Docker Compose file format. The version you choose determines which features of Docker Compose are available to you.services: This section is used to define the different containers that make up the app. Each service runs one image and it will become a container when Docker Compose commands are executed.django: This is the name of the service.build: This tells Docker Compose to build an image for this service../apiis the path to the directory containing the Dockerfile. Docker Compose will use this Dockerfile to build the image for thedjangoservice.command: python manage.py runserver 0.0.0.0:8000will be executed within the container. It starts a Django development server. 0.0.0.0:8000 makes the server accessible from outside the container.volumesin Docker are used to persist data generated by and used by Docker containers. In this configuration, the host directory./api/is mounted into the container at/usr/src/api/, ensuring any changes made in the host directory are reflected inside the container.portsare mapped from the container to the host to allow network access to the container. The configuration8000:8000exposes port 8000 on the container and maps it to port 8000 on the host, enabling external access to the service running inside the container.environment variablesare defined in an external file and loaded into the container to configure its behaviour without hardcoding values. Theenv_file: - ./.env.devline tells Docker to use the.env.devfile from the host to set environment variables inside thewebcontainer.
create a .env.dev file in the project root to store environment variables for development:
  DEBUG=1
  SECRET_KEY=putyourapikeyshere
  DJANGO_ALLOWED_HOSTS=localhost 127.0.0.1 [::1]
Build the image
$ docker-compose buildOnce the image is built, run the container
$ docker-compose up -dNavigate to http://localhost:8000/ to again view the welcome screen.

Adding a Postgres Database
Use the official PostgreSQL image from Docker Hub to configure Postgres.
Add a new service to the docker-compose.yml file called
postgres.image: This specifies which Docker image to use for the container.postgres:15tells Docker to pull version 15 of the official PostgreSQL image from Docker Hub.environment:This section sets environment variables within the container. These variables are used by PostgreSQL to configure the database instance.
Dockerize PostgreSQL: Define the database configuration (like username, password, and database name) in a Docker Compose file or as environment variables in the Docker container.

The final docker-compose.yml file should be similar to this:
version: '3.8'

services:
  django:
    build: ./api
    command: python manage.py runserver 0.0.0.0:8000
    volumes:
      - ./api/:/usr/src/api
    ports:
      - 8000:8000
    env_file:
      - ./.env.dev
    depends_on:
      - postgres

  postgres:
    image: postgres:15
    volumes:
      - postgres_data:/var/lib/postgresql/data/
    environment:
      - POSTGRES_USER=django
      - POSTGRES_PASSWORD=<passowrd_for_DB>
      - POSTGRES_DB=django

volumes:
  postgres_data:
You will also need to update your Dockerfile with the following info:
# pull official base image
FROM python:3.11.4-slim-buster

# set work directory
WORKDIR /src/api

# set environment variables
ENV PYTHONDONTWRITEBYTECODE 1
ENV PYTHONUNBUFFERED 1

# install system dependencies
RUN apt-get update && apt-get install -y netcat

# install dependencies
RUN pip install --upgrade pip
COPY ./requirements.txt .
RUN pip install -r requirements.txt

# copy entrypoint.sh
COPY ./entrypoint.sh .
RUN sed -i 's/\r$//g' ./entrypoint.sh
RUN chmod +x ./entrypoint.sh

# copy project
COPY . .

# run entrypoint.sh
ENTRYPOINT ["/usr/src/api/entrypoint.sh"]
What is the Entrypoint?
The entrypoint.sh file should created in the same directory as the Dockerfile.
#!/bin/sh

if [ "$DATABASE" = "postgres" ]
then
    echo "Waiting for postgres..."

    while ! nc -z $SQL_HOST $SQL_PORT; do
      sleep 0.1
    done

    echo "PostgreSQL started"
fi

# run the commented commands manually when the container has been built
# python manage.py flush --no-input
# python manage.py migrate
# docker-compose exec web python manage.py flush --no-input
# docker-compose exec web python manage.py migrate
exec "$@"
The ENTRYPOINT in a Dockerfile is crucial as it defines the default command executed upon container startup, serving multiple key roles:
Initialization Logic: The
entrypoint.shscript preps the environment before the app launches, handling tasks like service availability checks, database migrations, and environment variable settings, ensuring the app's environment is properly configured.Consistency and Reliability: It guarantees that the container initiates in a consistent state, enhancing application reliability by avoiding incorrect or misconfigured starts.
Customization: Offers a centralized way to tailor container startup behaviour without altering the Dockerfile or app code, useful for adapting to different deployment environments.
Permissions Management: Ensures the
entrypoint.shscript is executable and correctly formatted in Linux, addressing common issues related to script execution across different operating systems.Control Flow: Facilitates complex startup sequences beyond simple commands, potentially managing multiple services or applications within a single container.
Error Handling: Incorporates logic for graceful error management and cleanup before shutdown, ensuring a smooth operation.
In summary, specifying entrypoint.sh as the ENTRYPOINT is vital for performing essential startup tasks and ensuring the application is properly initialized and configured within its containerized setting, marking the initial execution point for the application to function as intended.
Conclusion
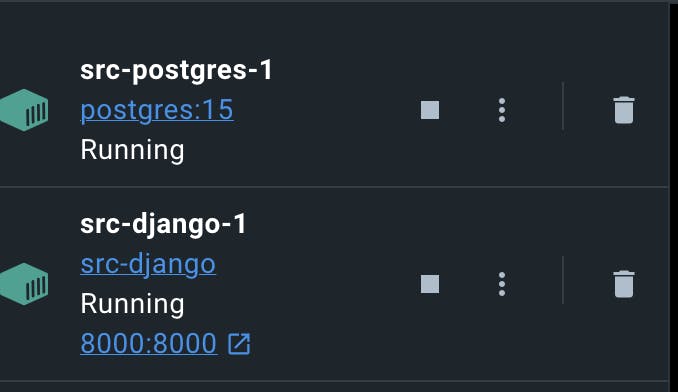
On Docker Deamon, we can view two containers running for our app. One for Django and the other for Postgres.
In conclusion, Docker emerges as a great tool in software development and deployment. It offers a seamless solution to the age-old problem of inconsistent environments across development, staging, and production. In this blog post, we have described Docker's fundamental concepts, from its relevance in providing a consistent development environment to the hands-on demonstration of deploying a Django REST API application integrated with a Postgres database. We've delved into the essentials of Docker commands, the distinction between Docker images and containers, and the streamlined process of setting up Docker on your system.
The exploration of Docker Compose further highlighted Docker's role in orchestrating multi-container applications, showcasing how services like Django and PostgreSQL can be efficiently managed and interconnected.
The pivotal role of the ENTRYPOINT script, as discussed, underscores Docker's flexibility in initializing and configuring containerized applications. This script not only ensures that containers start with the correct setup but also embodies Docker's philosophy of making development and deployment processes as frictionless as possible.
Whether you're a seasoned developer or new to the world of containerization, Docker offers a robust set of tools to elevate your development practices. Embracing Docker means embracing a future where the focus shifts from dealing with environmental inconsistencies to achieving innovation and excellence in software development.