

How to Build a To-Do Checklist with Django ✏️
Learn how to deploy a really cool To-Do app using Django backend and Bulma CSS frontend


Hi all! 💙 😁
In this blog post, I will demonstrate how to build a to-do checklist using Django. See the video 🎥 below ⤵️ for a 30 seconds clip that showcases how the app functions.
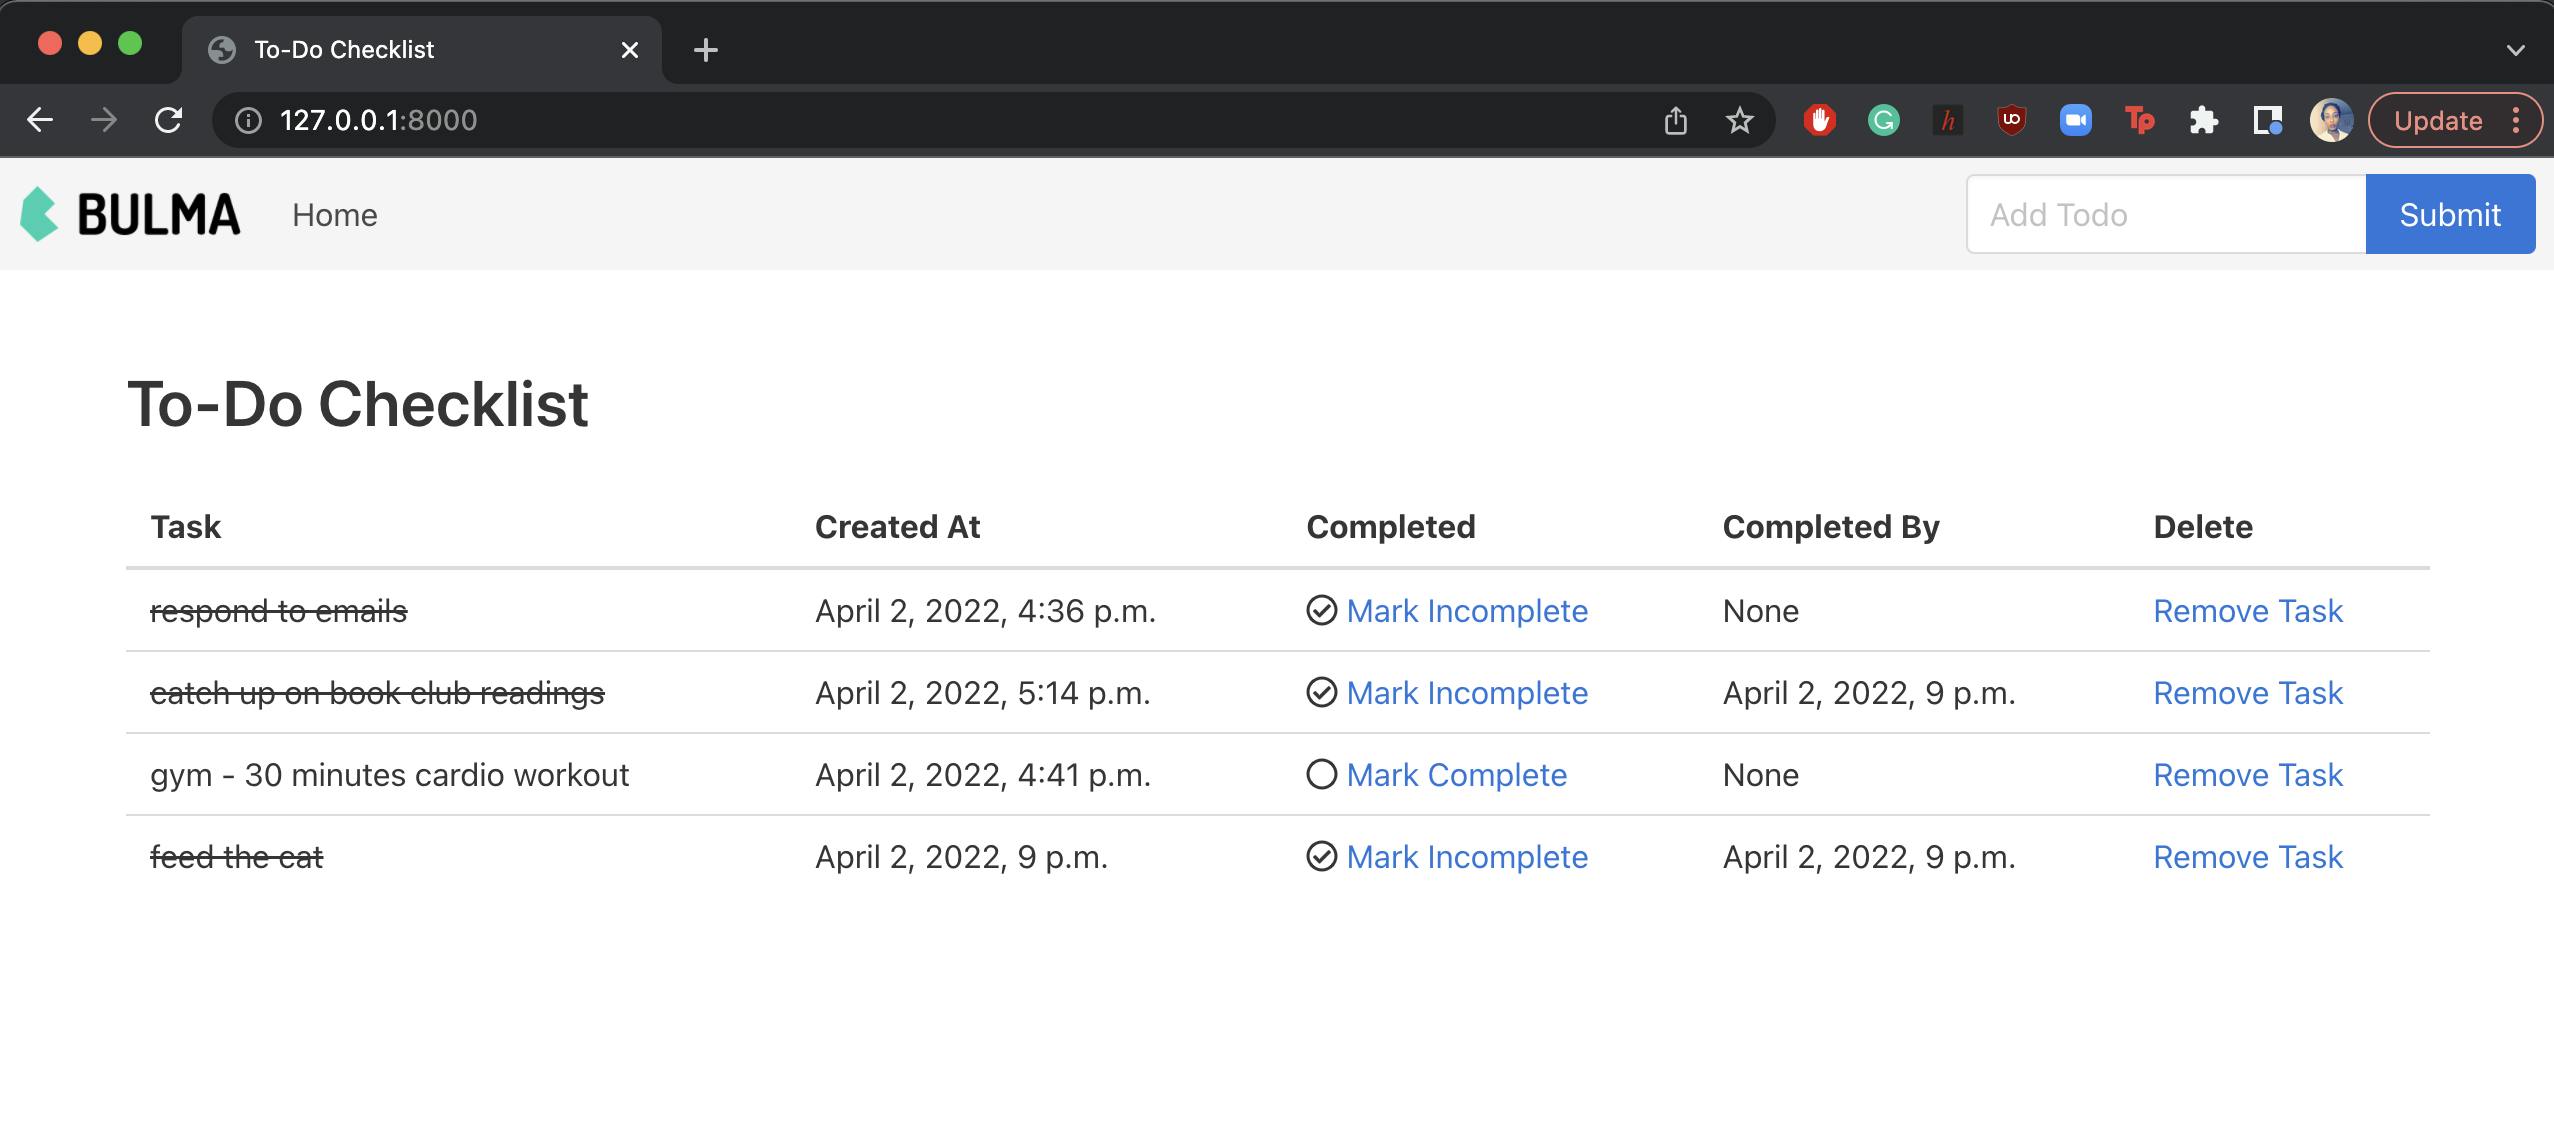
On a locally deployed Django web application, the user is able to create items for the to-do checklist. The creation date and time of the to-do item are stored in the database automatically. The user can mark and unmark items as completed or incomplete. The date and time for completing the to-do items are saved as well.
Learning Objectives 🔖
- Set up and deploy a Django web app locally
- Create Django database models
- Query objects in Django SQLite databases
- Update objects in Django SQLite databases
Prerequisites
Some of the things you should know/have in order to fully understand and replicate this demo include 👇
- A working pc 💻 with Django and Python 🐍 ( > version 3) installed
- Familiarity with using a code editor of your choice to open and edit code files. I am using Pycharm.
- Ability to run commands on the command line interface.
Setting up Django 🚀
Django is a Python web framework that enables web applications to be easily deployed. In a Django project, all of the initial code and files that are required to run the app are properly created and structured for the developer. See 👀 detailed steps for deploying a Django app in the Django documentation.
Navigate to the project folder on your CLI and run the following commands to;
- Create a virtual environment
- Activate the virtual environment
- Install Django
- Create a Django project
python3 -m venv todoenv
source todoenv/bin/activate
python3 -m pip install Django
Django-admin startproject todochecklist
A folder for the project will be created. Navigate into this folder and run the following commands to;
- Create an app for the project
- Run the created app locally
python manage.py startapp todo
python manage.py runserver
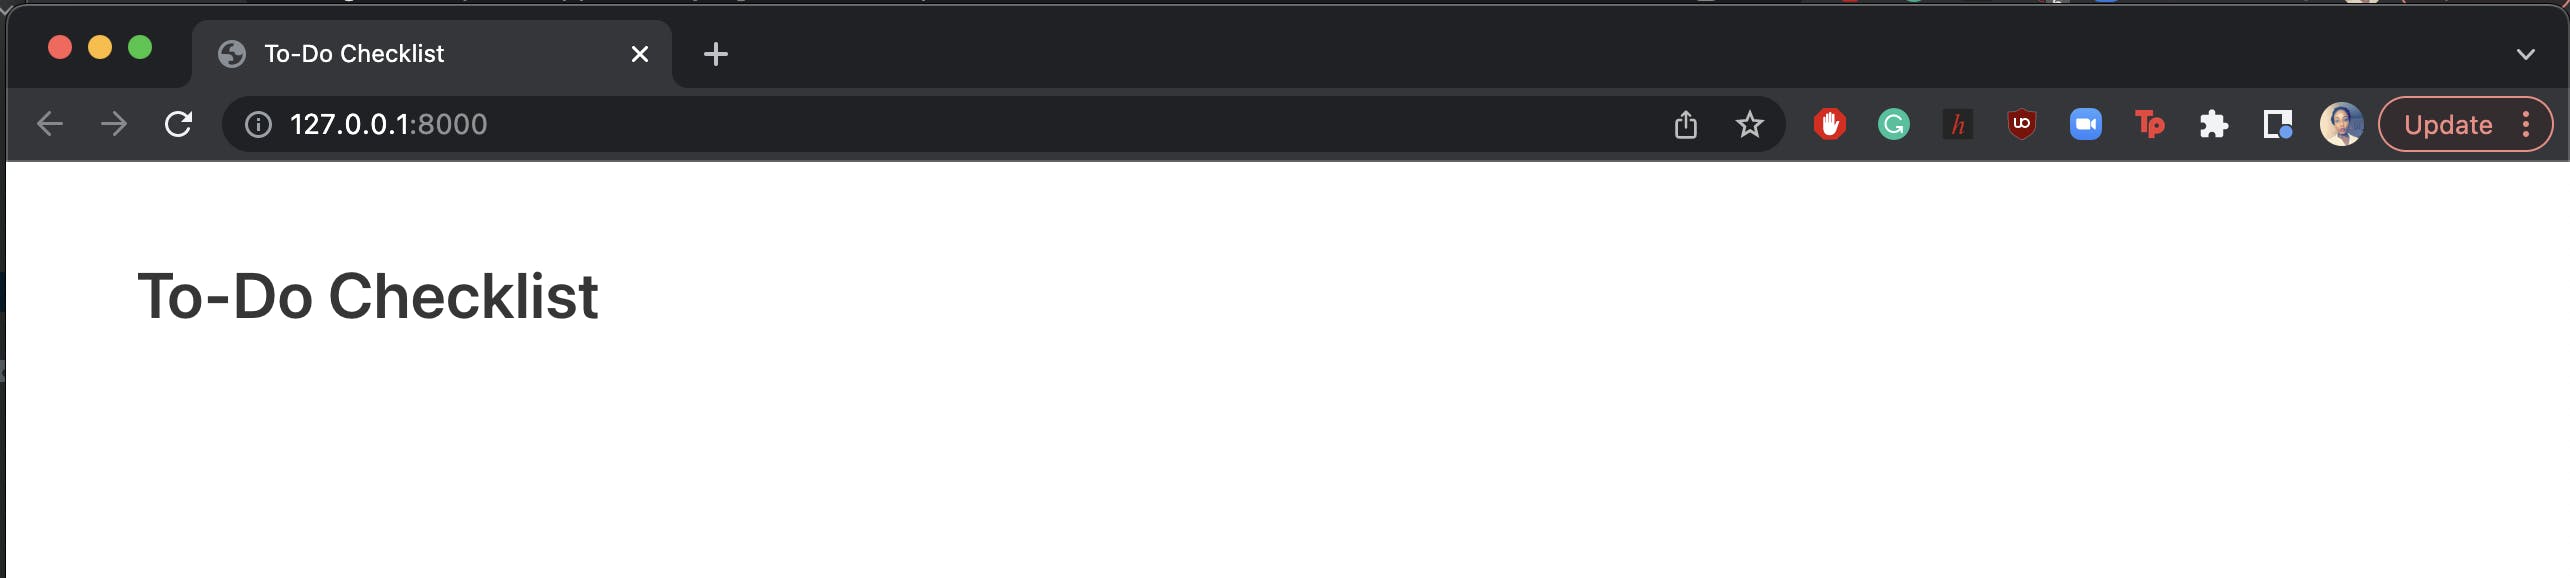
Hurray! 🎉 🎉 🎉 Your app should be running locally now. You can view it from the web browser on port 8000 http://127.0.0.1:8000/. Everything is working fine so far as you can view this screenshot on your browser.

Editing files on your code editor
To move forward with creating the app, open the project folder in the code editor of your choice. I am using PyCharm because I think it's really handy to write Python code on it. 😍 😍 😍

templates
- Create a folder called templates in the todo folder.
- Create a home.html file in the templates folder. For this project, we use Bulma CSS for styling. This is set up in the head tags of the HTML file.
<html lang="en">
<head>
  <meta charset="UTF-8">
  <title>To-Do Checklist</title>
  <meta name="viewport" content="width=device-width, initial-scale=1">
  <link rel="stylesheet" href="https://cdn.jsdelivr.net/npm/bulma@0.8.2/css/bulma.min.css">
  <script defer src="https://use.fontawesome.com/releases/v5.3.1/js/all.js"></script>
</head>
<body>
  <h3>To-Do Checklist</h3>
</body>
</html>
urls.py (in todochecklist folder)
from django.urls import path, include
from django.contrib import admin

urlpatterns = [
    path('admin/', admin.site.urls),
    path('', include('todo.urls')),
]
urls.py (in todo folder)
- Create a file named urls.py in the todo app folder
from django.urls import path
from .views import home
from django.contrib.staticfiles.urls import staticfiles_urlpatterns

app_name = "todo"

urlpatterns = [
    path("", home, name="home"),
]

urlpatterns += staticfiles_urlpatterns()
settings.py
- Register the name of the app "todo" under installed apps.
INSTALLED_APPS = [
    'django.contrib.admin',
    'django.contrib.auth',
    'django.contrib.contenttypes',
    'django.contrib.sessions',
    'django.contrib.messages',
    'django.contrib.staticfiles',
    'todo',
]
Reload your web browser page to view the changes you have made
Create Django Database Models
The database model is a source of truth for the type of data that is stored on the app. By editing the models.py file, we can create the fields (similar to column names in a spreadsheet) for data (objects) that will be stored in the database. For this project, an object will refer to a to-do checklist item. Each class on the models forms a table in the database. The class attributes (task, completed, creation_date, and completion_date) are the fields for the objects. For each checklist item, we want the name of the item, its completion status, the date/time that it was created, and the date/time that it was completed.
models.py
from django.db import models

class Todo(models.Model):
    task = models.CharField(max_length=200)
    completed = models.BooleanField(default=False)
    creation_date = models.DateTimeField(blank=True, null=True,  auto_now_add=True)
    completion_date = models.DateTimeField(null=True, blank=True)

    def __str__(self):
        return self.task
- A default value is set for the creation_date field.
- After making changes to the models.py file, run the following commands to implement the changes on the database.
python manage.py makemigrations
python manage.py migrate
Django Admin
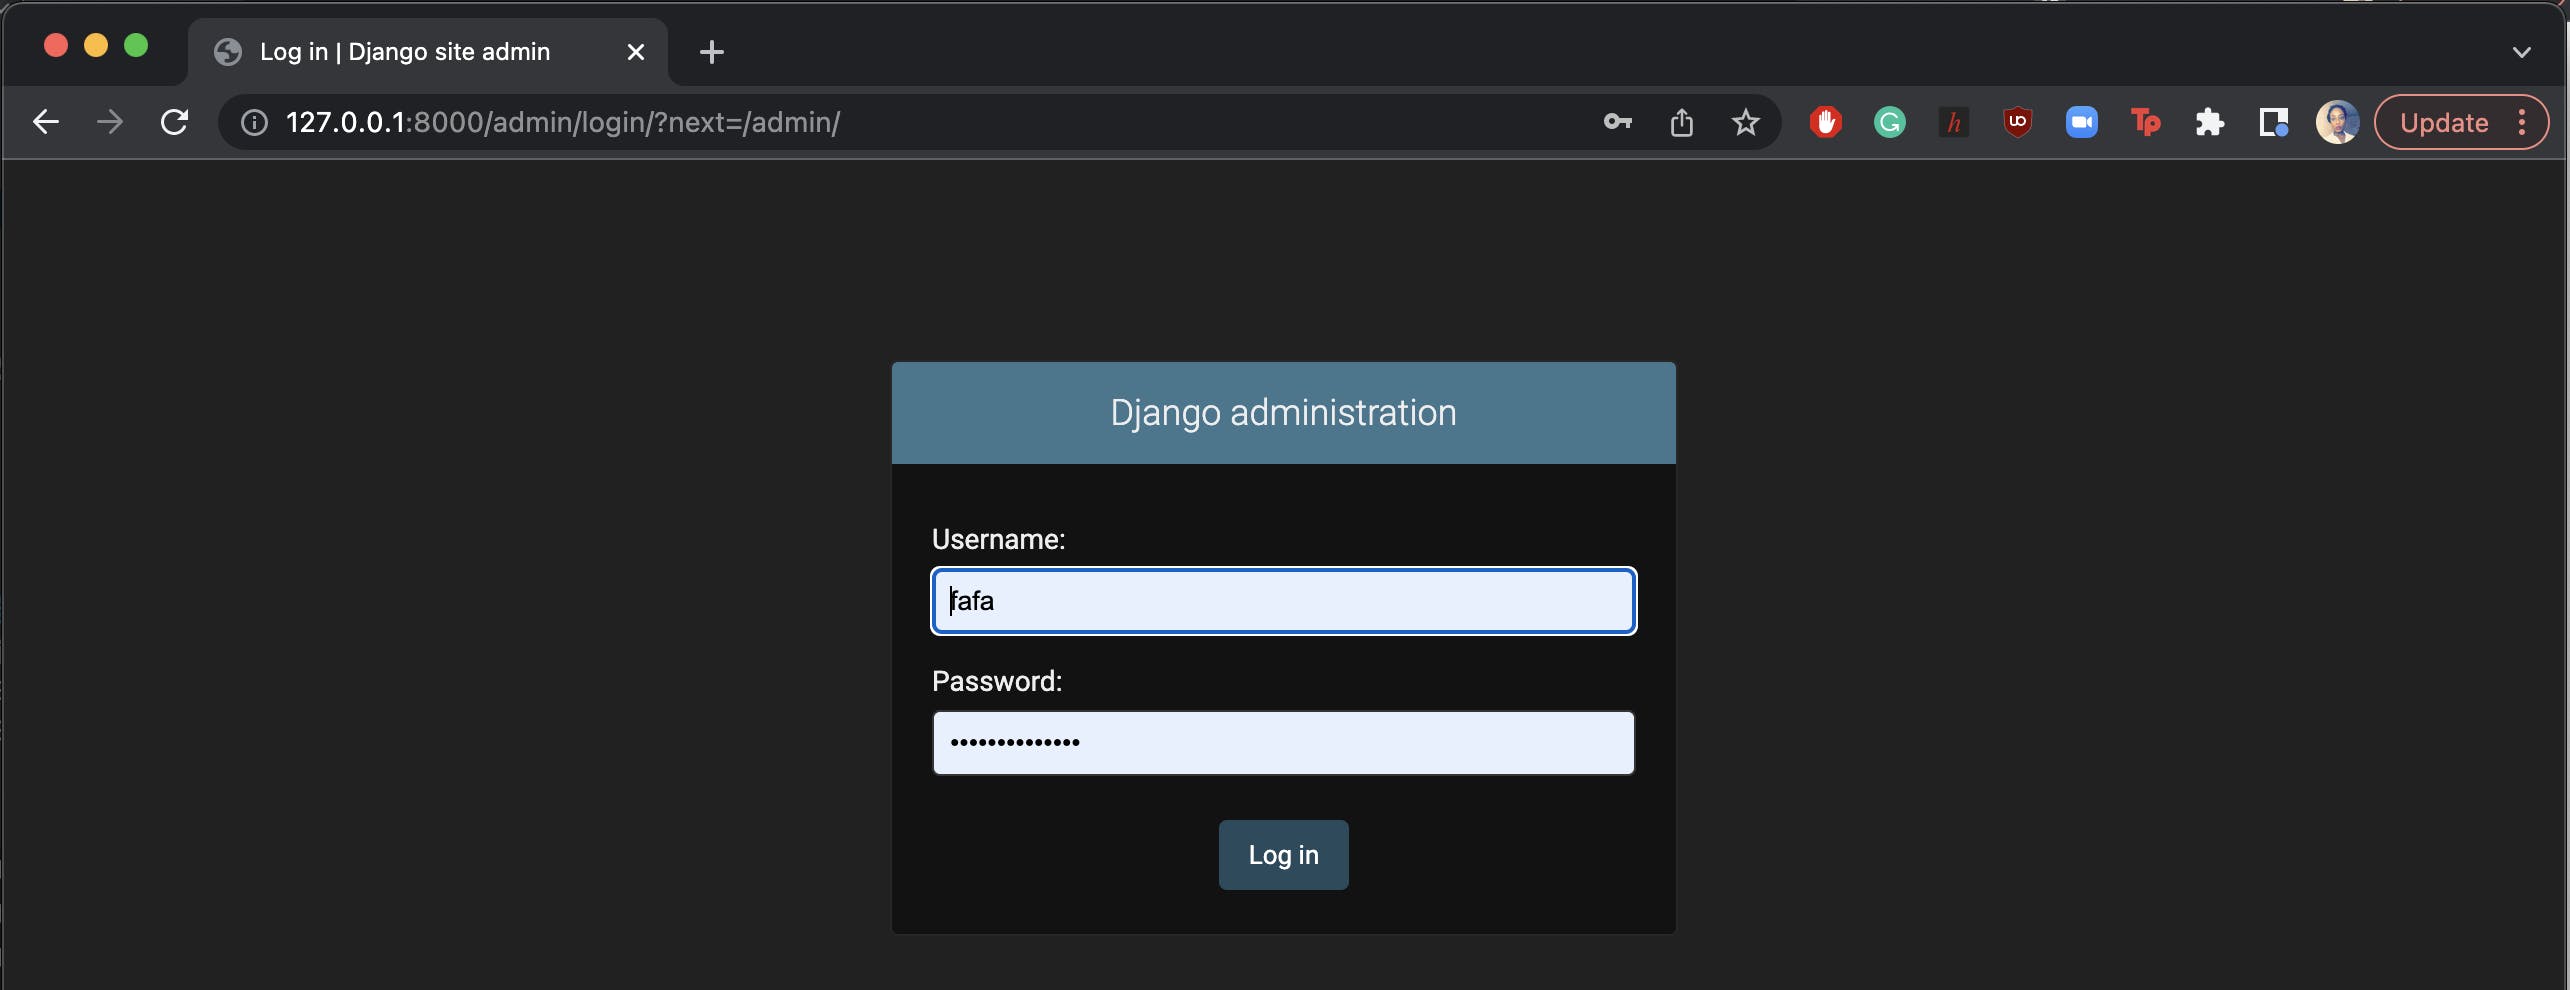
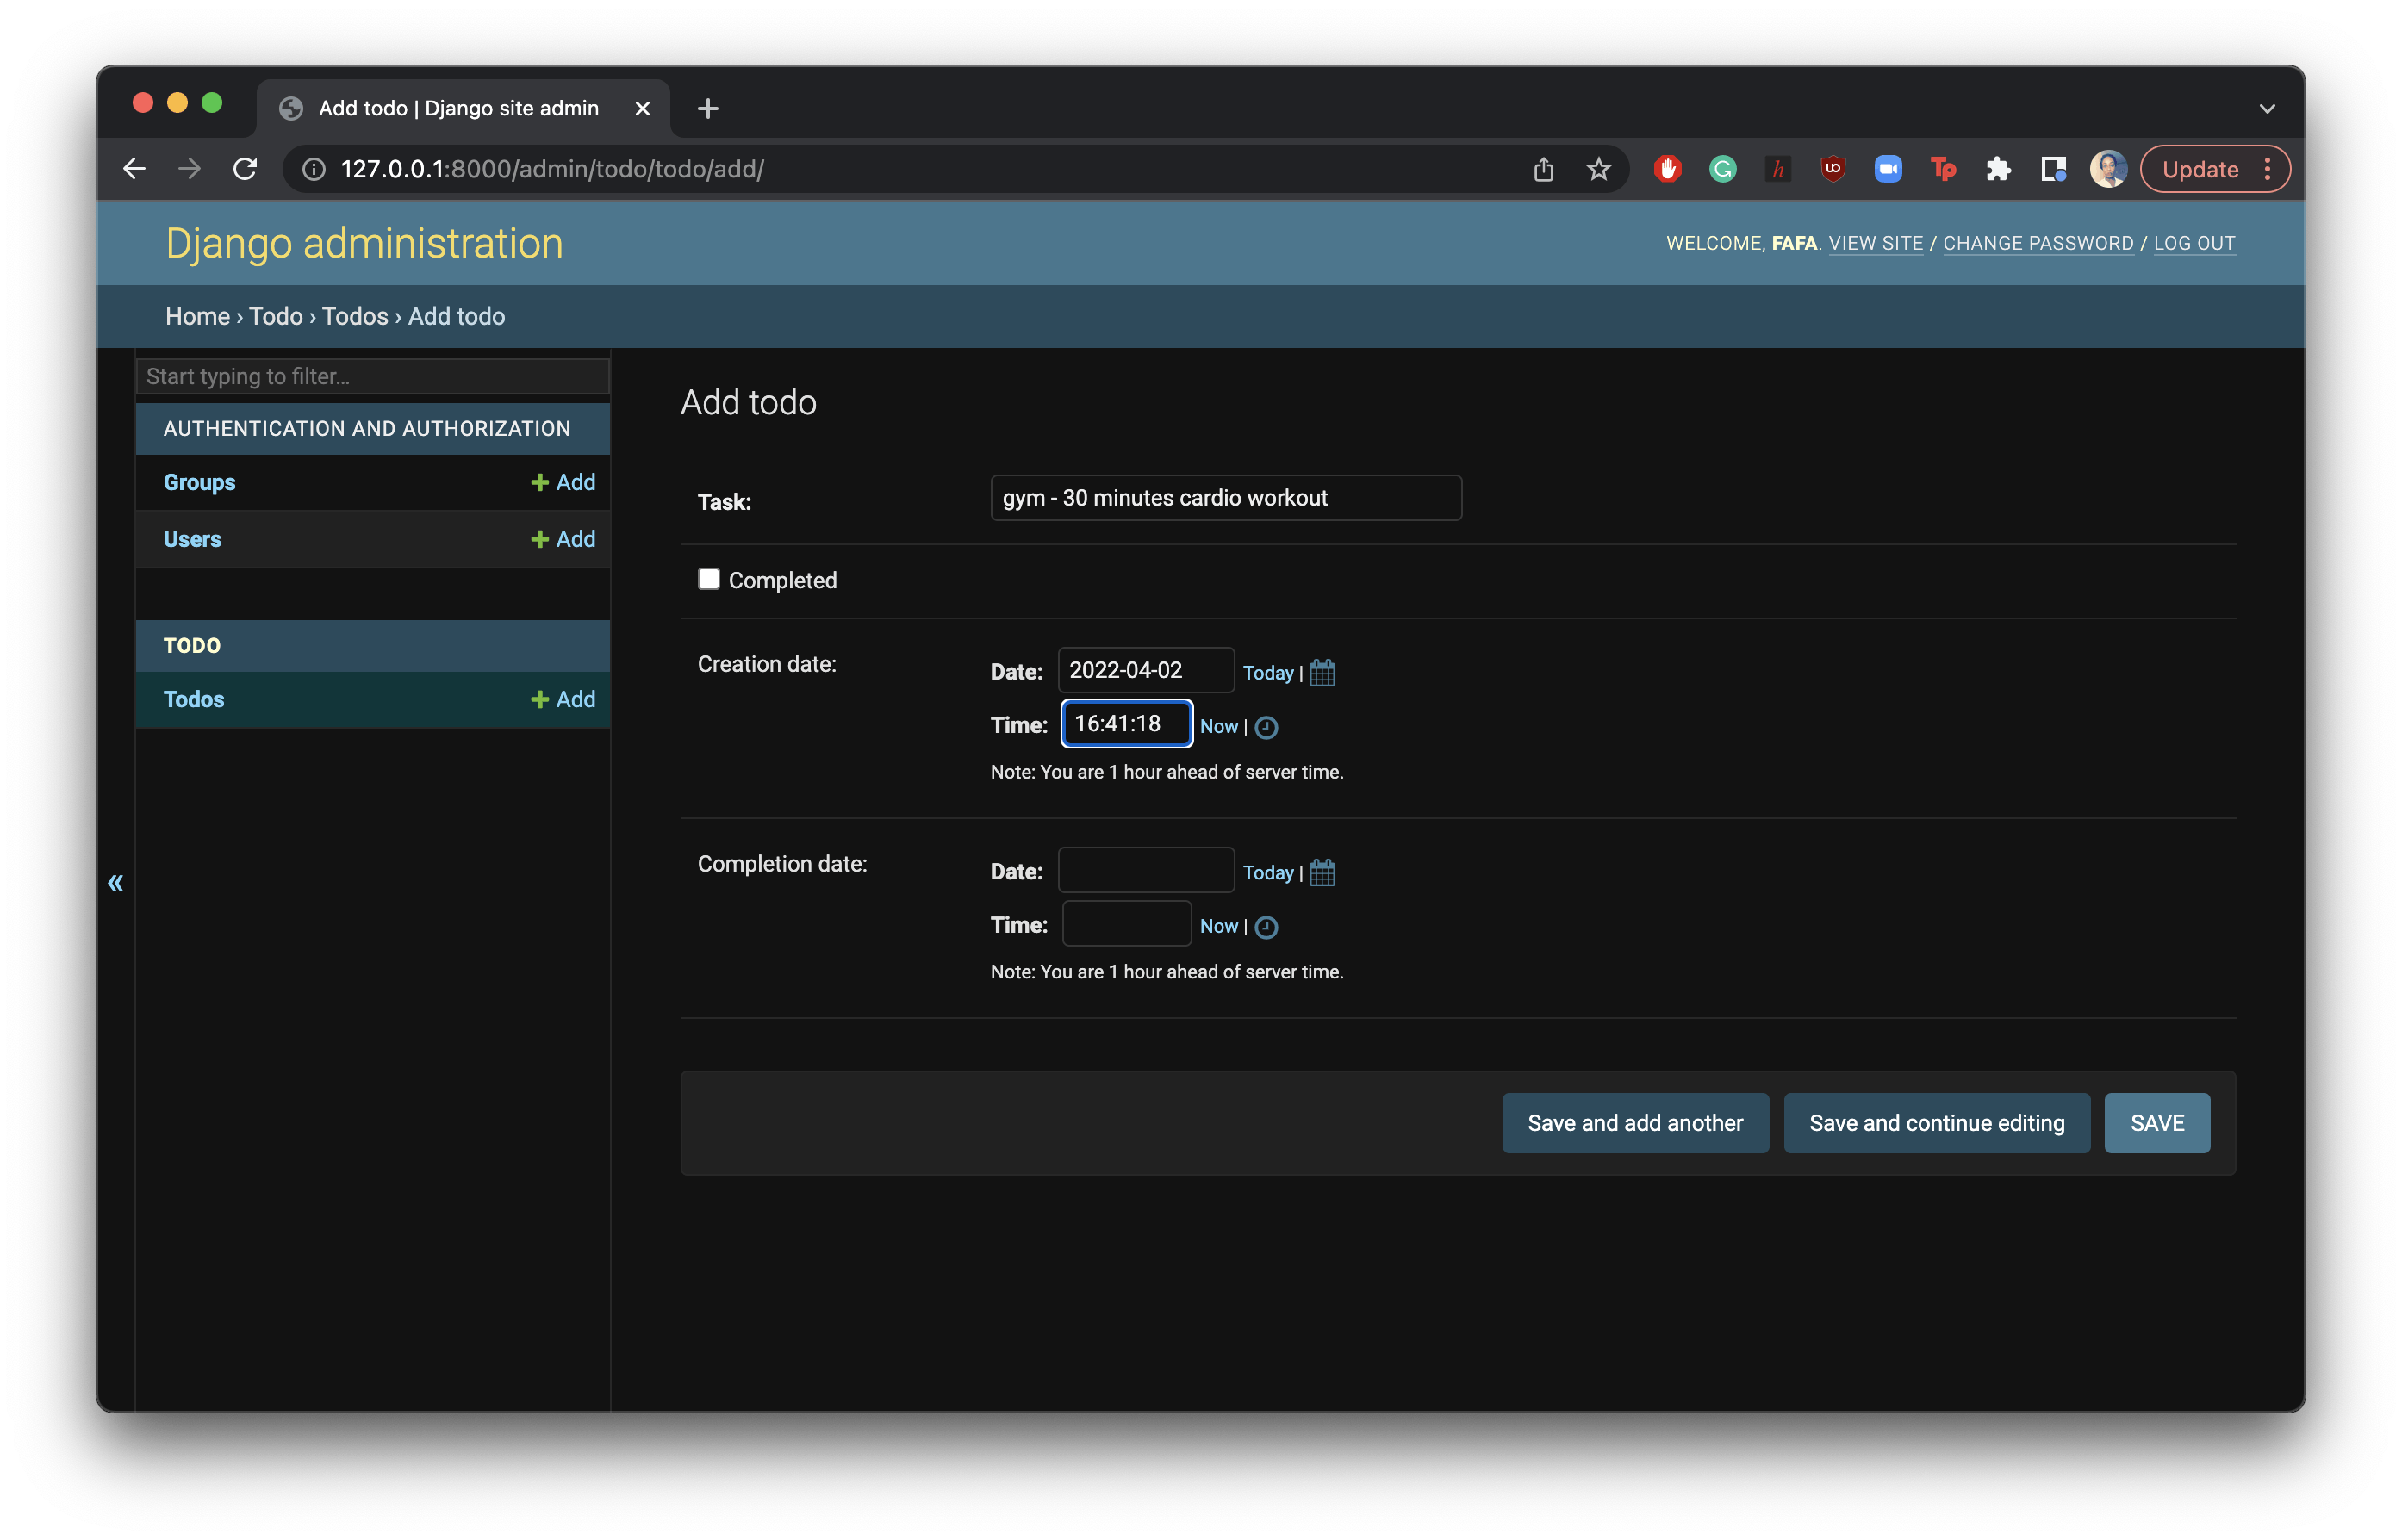
- Create a user account for your app. Run the command below and follow the instructions to create a user account. Use the login details to sign in to the Django admin site on 127.0.0.1:8000/admin
python manage.py createsuperuser
- Register your model on the admin.py file so that the table that has been created for it in the databse is visible. Refresh the admin site.
from django.contrib import admin
from .models import Todo

admin.site.register(Todo)
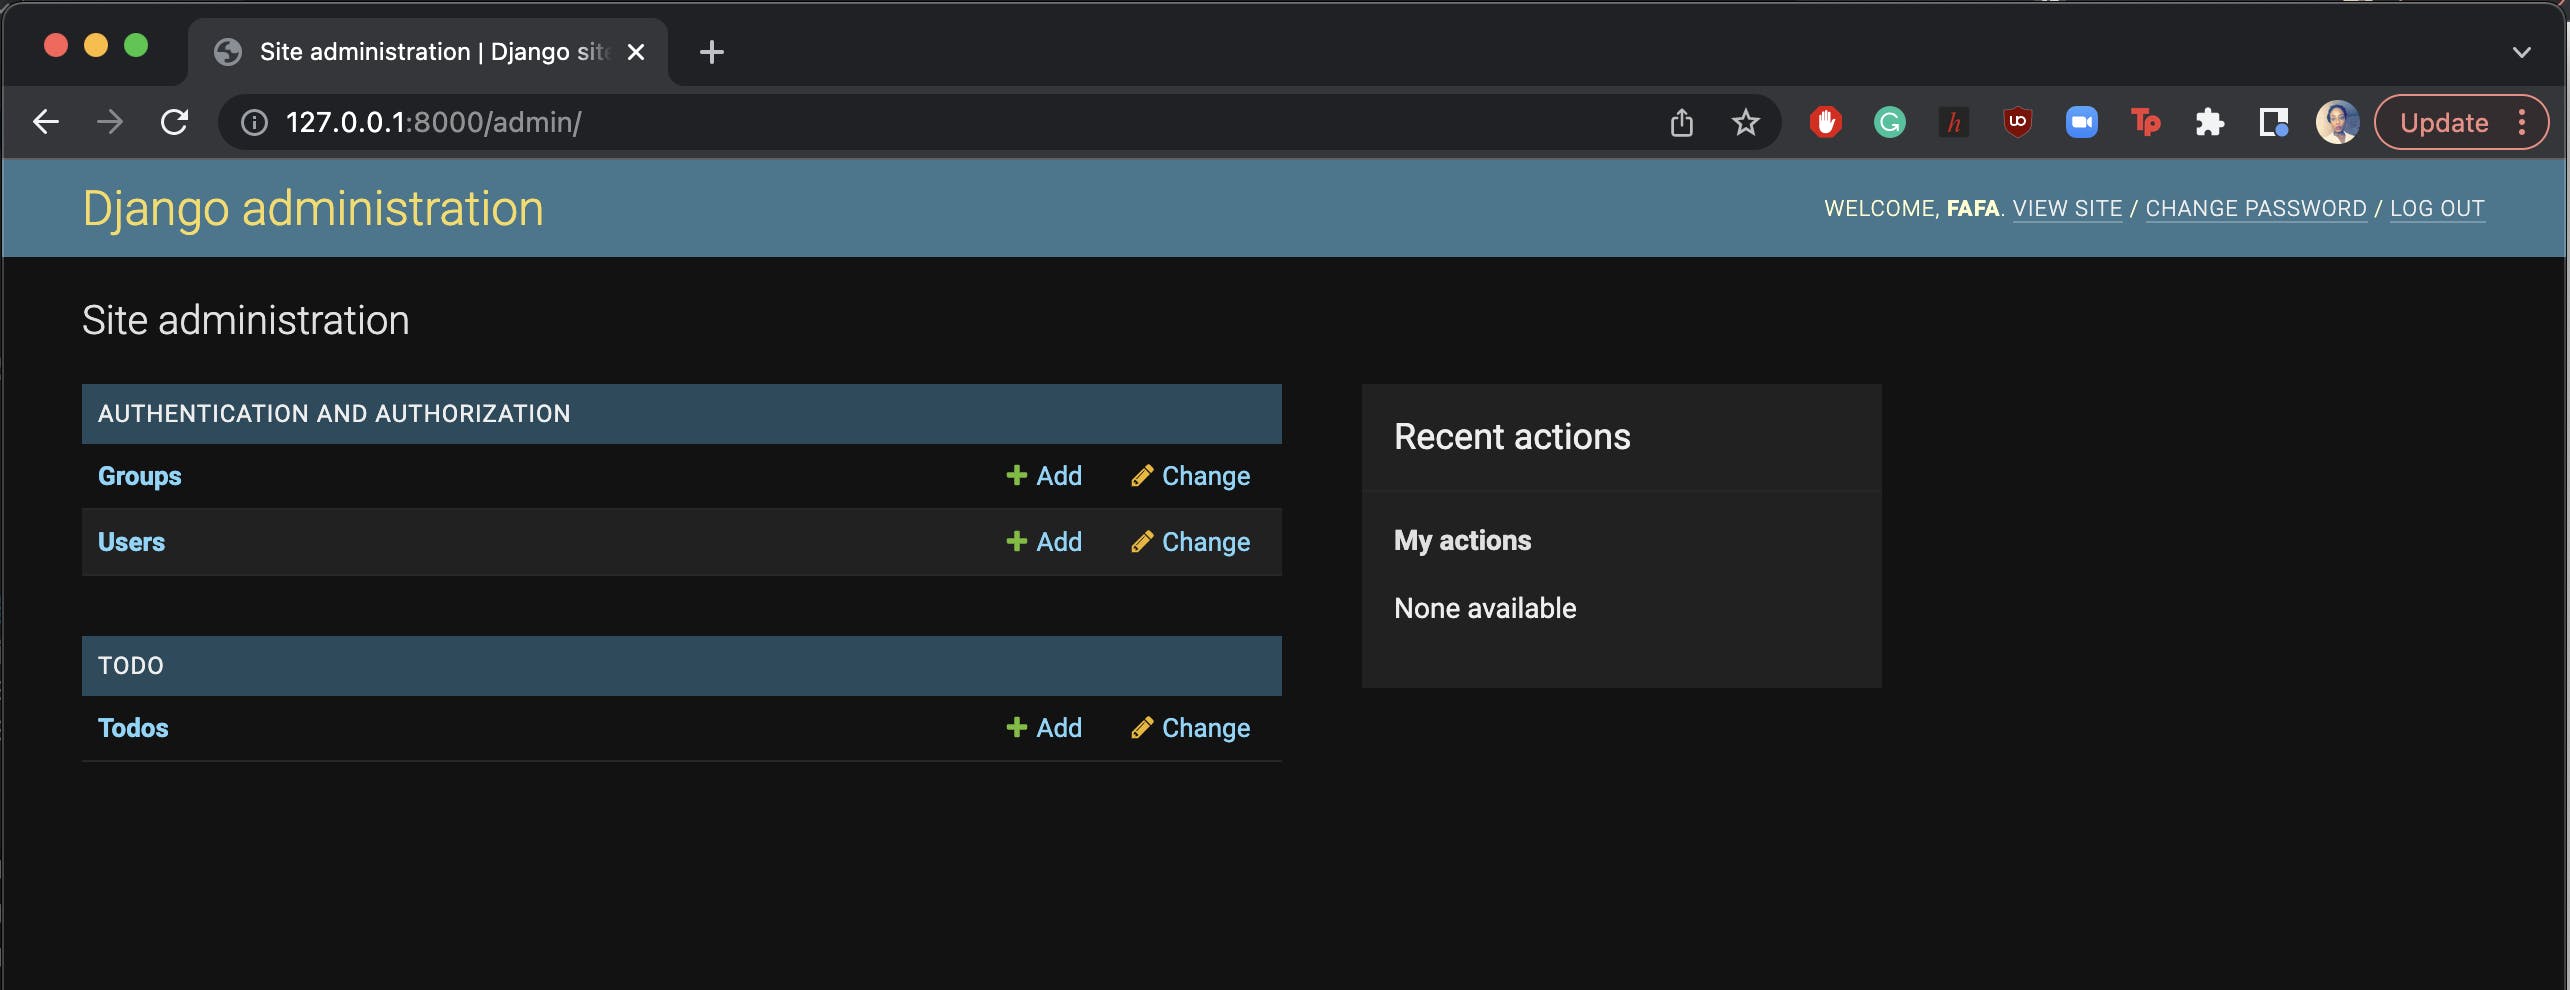
From here, we can add a number of to-do items that we can work with later.

Querying the Database
On the app frontend, how can we retrieve the data that we have created in the database? 💭 🙆♀️ 😟 How can the to-do list items be visible on the frontend home page? 💭 🙆♀️ 😟
views.py file
from django.shortcuts import render
from .models import Todo

def home(request):
    todos = Todo.objects.all()
    return render(request, "home.html", {'todos': todos})
On the home.html file
<section class="section">
        <div class="container">
            <h1 class="title">
                To-Do Checklist
            </h1>
            {% for todo in todos %}
                <h4 class="title">
                    {{ todo.task }}
                </h4>
            {% endfor %}
        </div>
    </section>
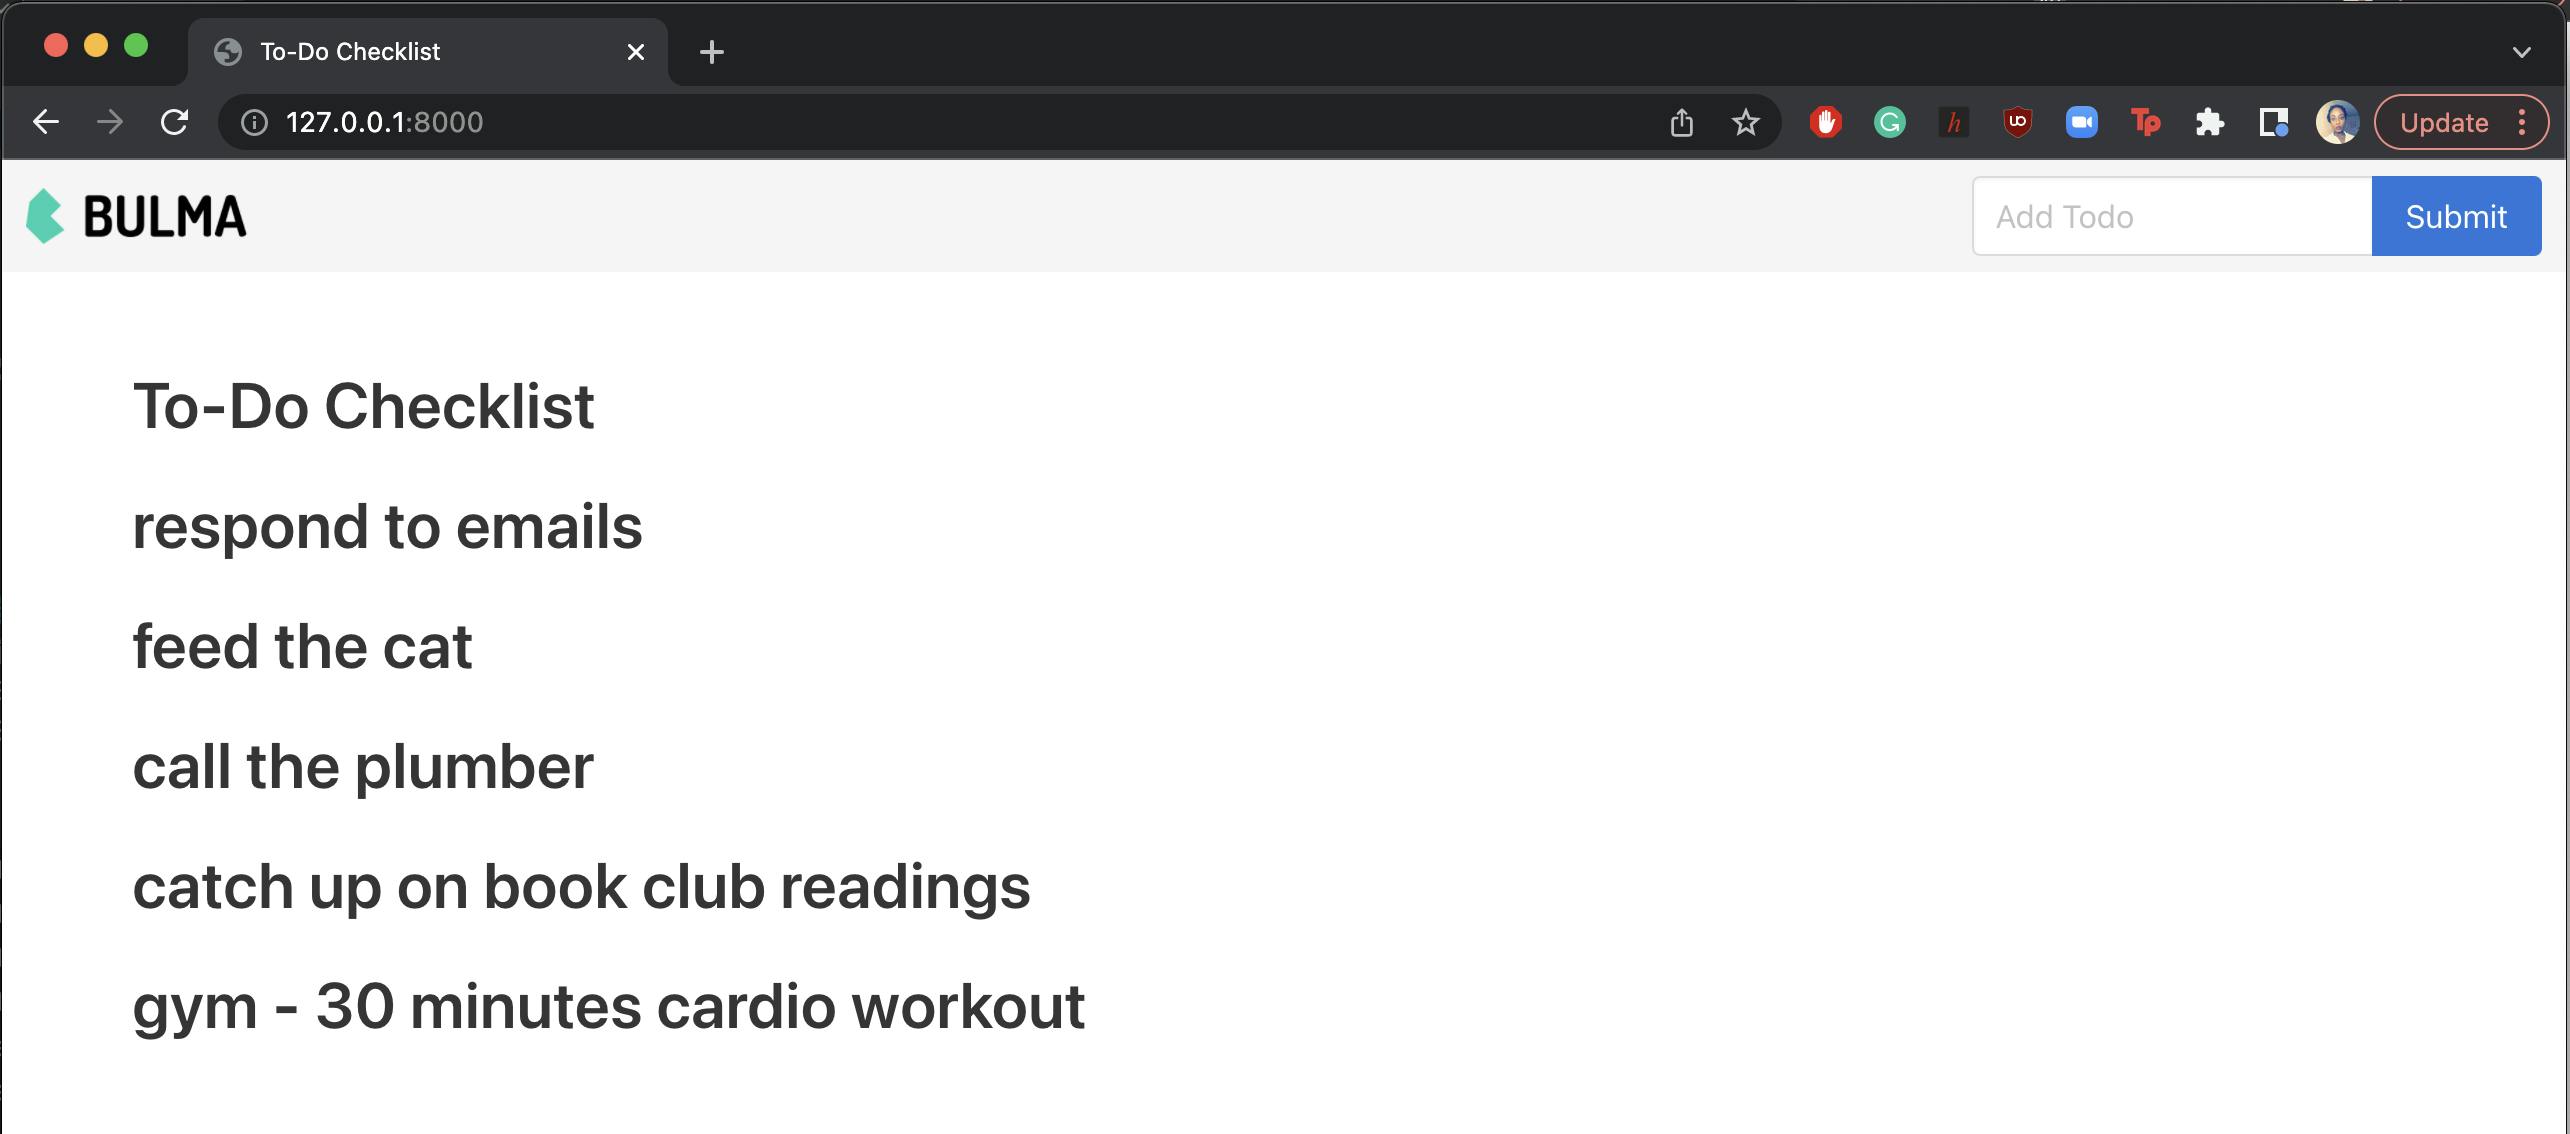
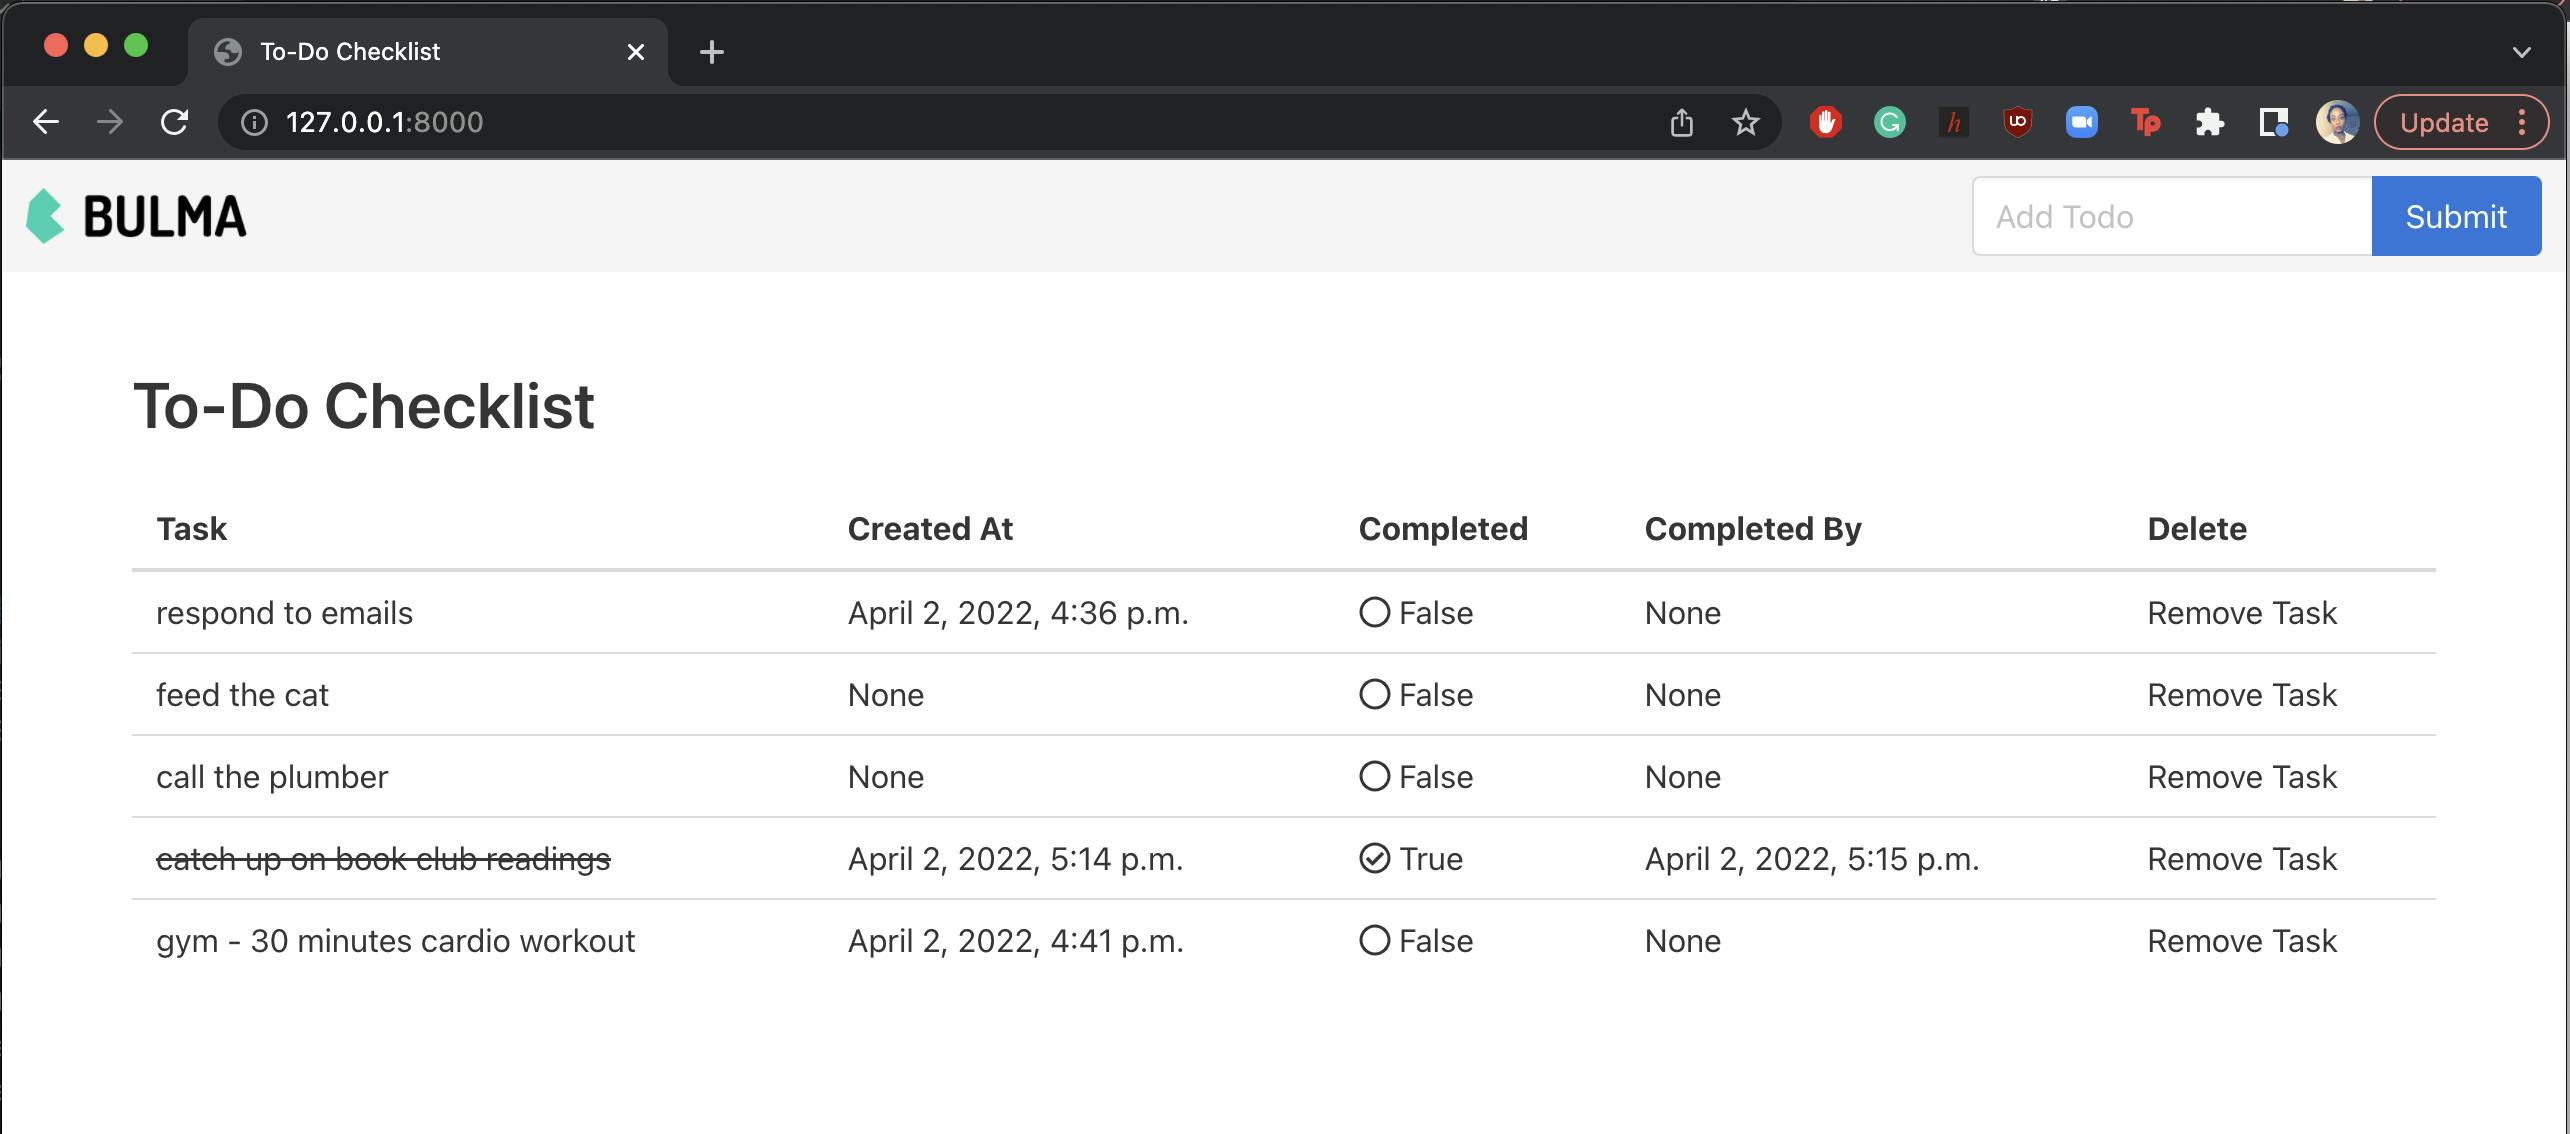
The rest of the code for the app frontend can be seen on the home.html file in the project's GitHub repo. For the frontend layout, we use Bulma's table format to arrange the rows and columns. 🙌 🙌 🙌 🙌
Creating Database Objects with Forms
From the frontend of the app, we can create the to-do list items in the database. We do this using Django forms. 💃 💃 💃
- Create a form.py file in the todo app folder.
from django import forms
from .models import Todo

class TodoForm(forms.ModelForm):
    class Meta:
        model = Todo
        fields = ['task', 'completed']
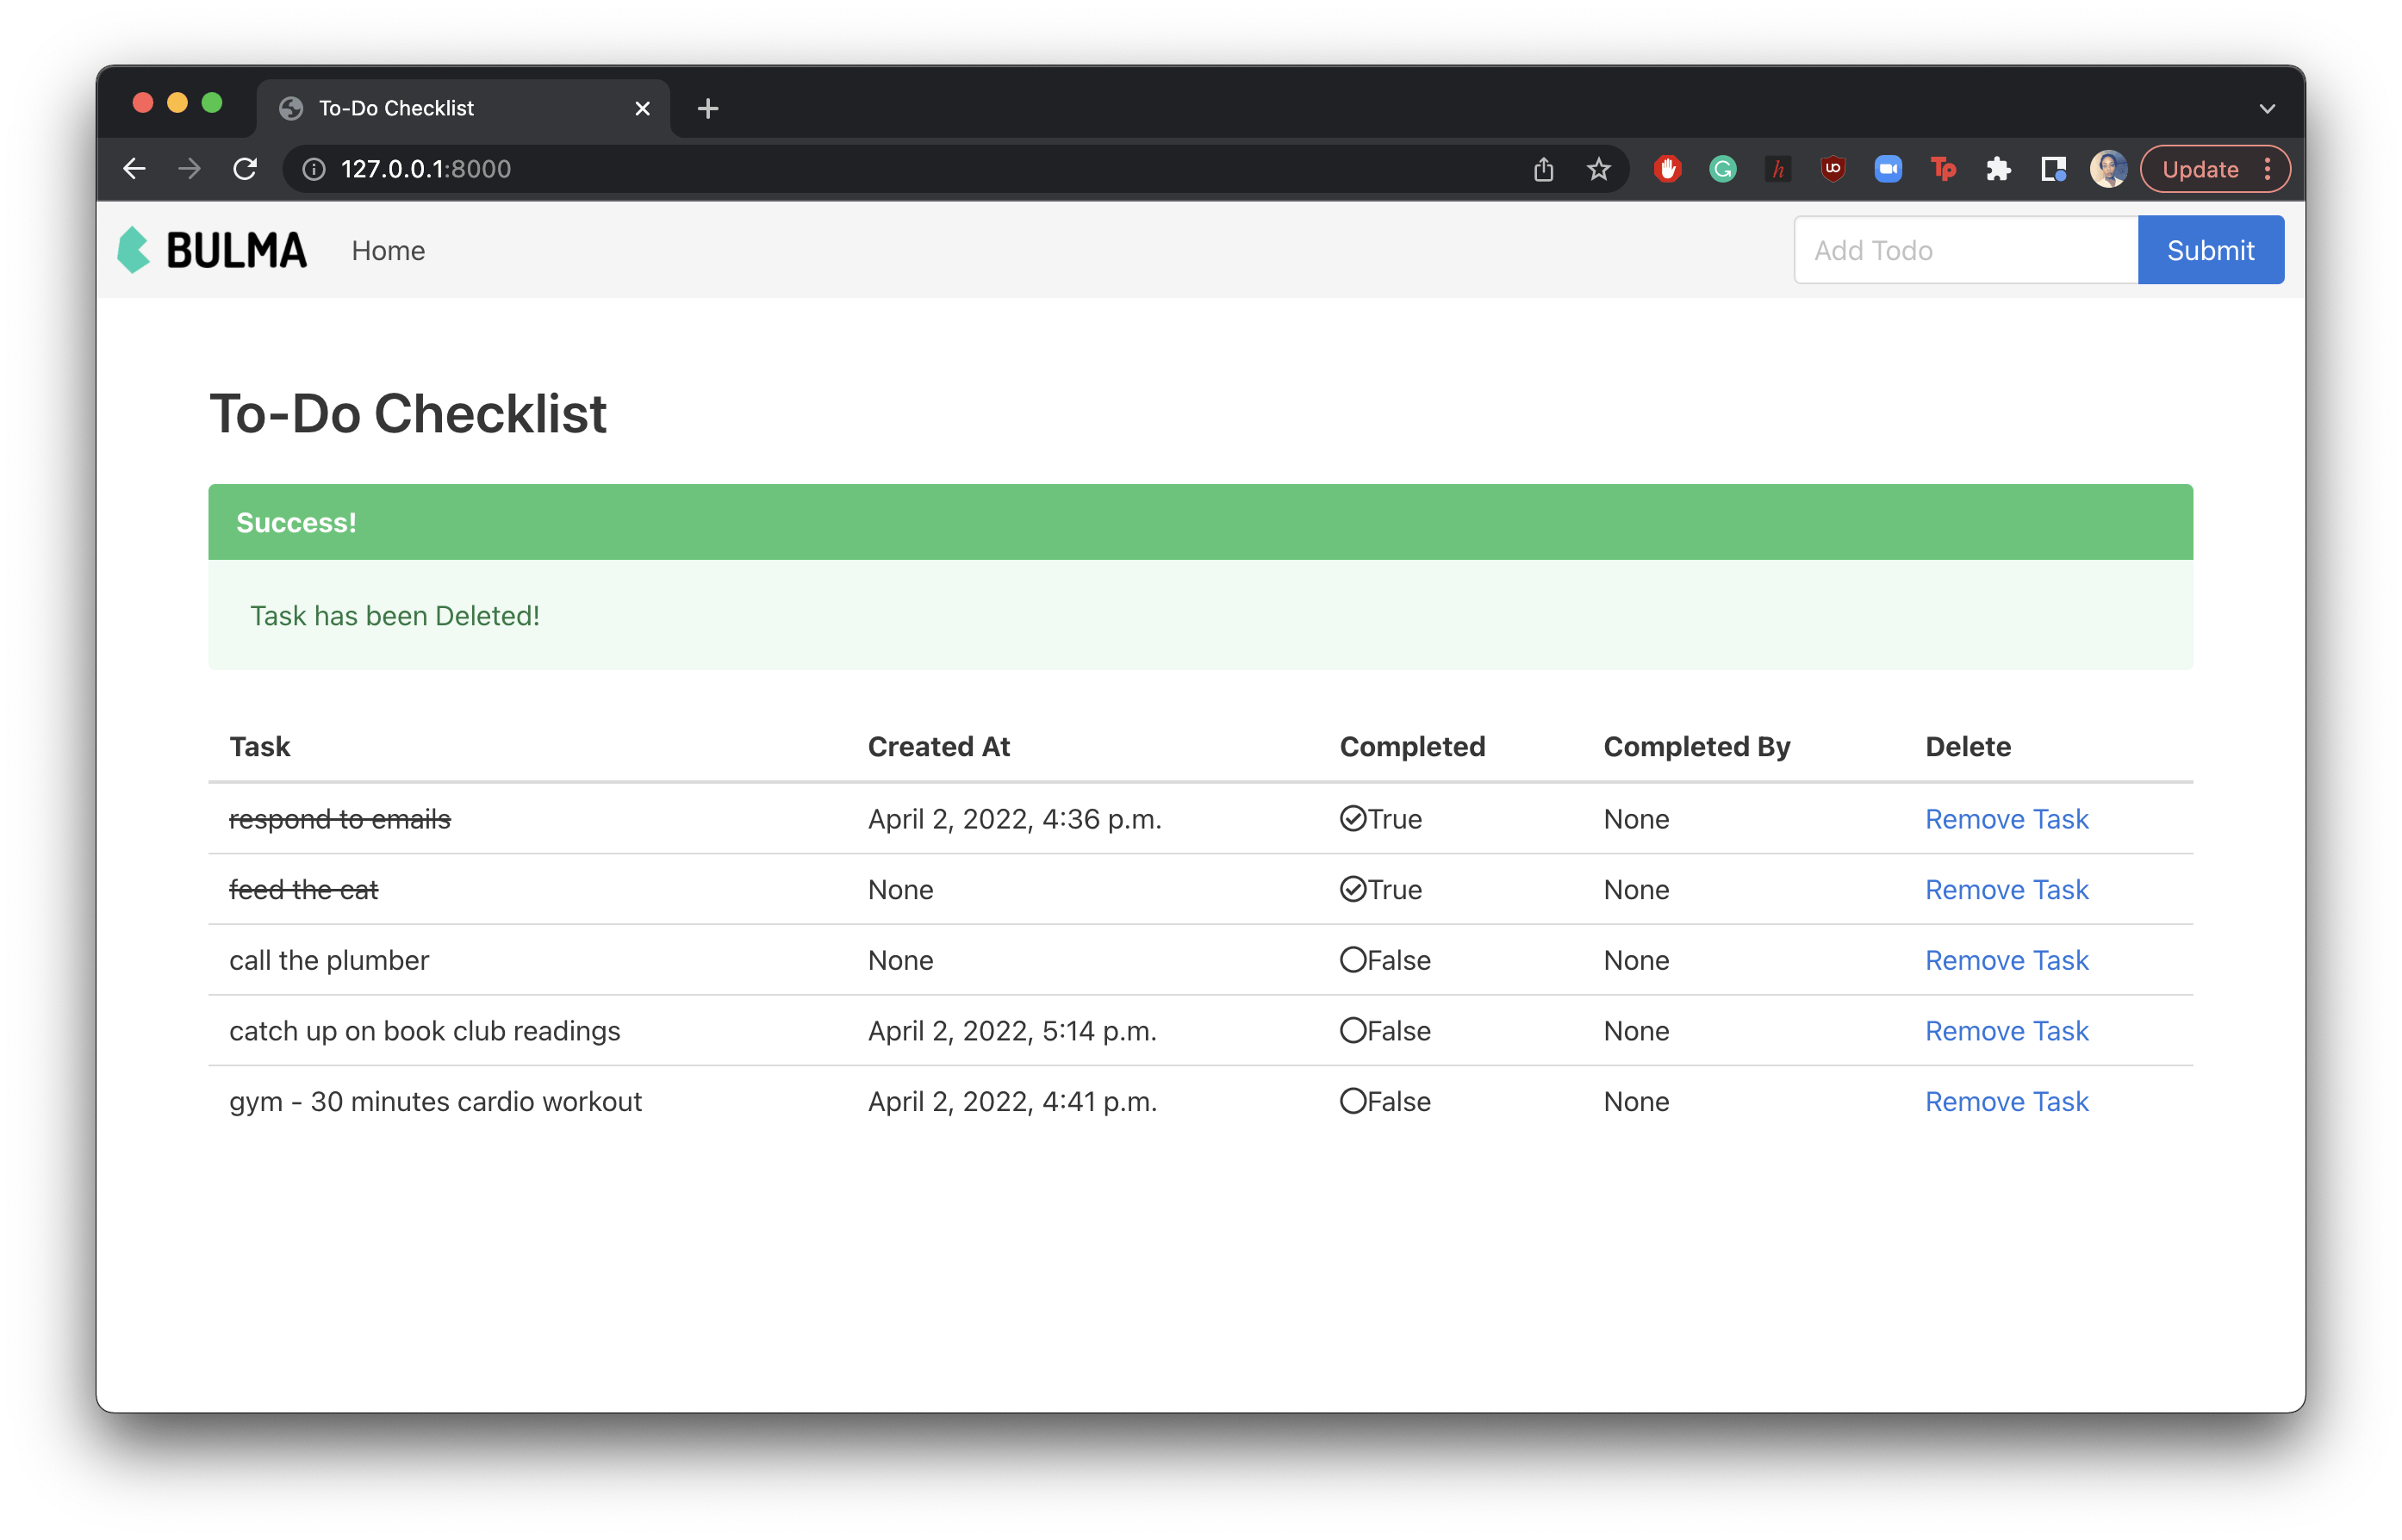
- Update the views.py file. When a to-do list item is successfully added to the database, a message success banner is displayed on the screen.
from django.shortcuts import render
from .models import Todo
from .forms import TodoForm
from django.contrib import messages

def home(request):
    if request.method == 'POST':
        form = TodoForm(request.POST or None)

        if form.is_valid():
            form.save()
            todos = Todo.objects.all()
            messages.success(request, ('Task has been added!'))
            return render(request, 'home.html', {'todos': todos})
        else:
            todos = Todo.objects.all()
            return render(request, 'home.html', {'todos': todos})

Deleting a To-Do Item from the Checklist
- Create a function for deleting in the views.py file.
def delete(request, todo_id):
  todo = Todo.objects.get(id=todo_id)
  todo.delete()
  messages.success(request, ('Task has been Deleted!'))
  return redirect('/')
Update the project level urls.py file with this line of code
path('delete/<int:todo_id>/', include('todo.urls')),Update the app level urls.py file with this line of code
path('delete/<int:todo_id>/', delete, name='delete'),- Remember to update the home.html file as required as well. 🏃🏃
Checking a To-Do Item as Complete/Incomplete
- Update the urls.py file in the todo folder with the following lines of code
from .views import mark_complete, mark_incomplete

path('mark_complete/<int:todo_id>', mark_complete, name="mark_complete"),
path('mark_incomplete/<int:todo_id>', mark_incomplete, name="mark_incomplete"),
- Update the urls.py file in the todochecklist folder
path('mark_complete/<int:todo_id>/', include('todo.urls')), path('mark_incomplete/<int:todo_id>/', include('todo.urls')), - Create functions for the to-do items that are marked as complete and incomplete in the views.py file. Import the datetime Python library to automatically set the date/time that a task is marked as completed. 😋 😋 😋
from datetime import datetime

def mark_complete(request, todo_id):
    todo = Todo.objects.get(id=todo_id)
    todo.completed = True
    todo.completion_date = datetime.now()
    todo.save()
    return redirect('/')

def mark_incomplete(request, todo_id):
    todo = Todo.objects.get(id=todo_id)
    todo.completed = False
    todo.completion_date = None
    todo.save()
    return redirect('/')
Conclusion
Hurray! 🚀 🚀 🚀 🚀 Our To-Do checklist app is complete.
Summary of the Features
On this app, the user is able to create to-do items, delete to-do items, and mark them as completed or incompleted.
When a to-do item is created or deleted, a success message banner for that action is displayed on the screen to notify the user.
When a to-do item is created, the date and time of creation are saved. When it is marked as complete, the date and time at which it was marked as complete are saved. When an item is not marked as completed, there is no date or time for its completion date.
Next steps
- View the full project code on GitHub. Please pay attention to the file structure in the project and app-level folders.
- What did you think of the blog post? Please share your comments. They will be super useful to me.
Cheers! 🎊 🍻 🎊 🍻 🎊 🍻